

How To Repeat A Shape Around A Circle In Illustrator
Round Corners Quickly in Illustrator
[Editor's Note: This article from 2007 describes how to make rounded corners in Illustrator CS6 and prior. If you're using Illustrator CC, there's a much easier method, as Chad Chelius shows in his 2016 post, "Working with Live Shapes in Adobe Illustrator."]
Rounding Some Corners
I recently got a request from someone who wanted to use Illustrator to create dynamically resizable buttons for a Web site. To complicate matters, he wanted the button style to be flexible enough that left-hand corners can be rounded, and right-hand corners can be rectangular corners, or vice versa (Figure 1).

Figure 1.
I can't even begin to tell you how often I hear requests from folks who want to round only some of the corners of an object in Illustrator. (I can hear those FreeHand users giggling because FreeHand can do that.)
So how did I do it? In a nutshell, I start with a regular rectangle. I use one fill with a rounded corner effect applied, and one without. Then I use the Transform effect to offset the fills slightly so that rounded corners are visible on one side only, or just on the top or bottom (Figure 2)
Figure 2.
More after the jump! Continue reading below ↓
Free and Premium members see fewer ads! Sign up and log-in today.
Here are the steps to do this yourself:
- Draw a rectangle. Fill it with your favorite color.
- Use the Appearance panel to add a new fill.
- With the new fill targeted, choose Effect > Stylize > Round Corners. Do your thing and give yourself some nice rounded corners. (If you're working with text, use the Effect > Convert to Shape > Rounded Rectangle option.)
- With that fill still targeted, choose Effect > Distort & Transform > Transform. Under the Move section, adjust your fill slightly so that it's offset from the original fill. Use horizontal movements to add rounded corners to the left or right, and vertical movements to add rounded corners to the top or bottom.
If you want everything to be centered, apply a Transform effect to another fill (without rounded corners) with the exact opposite settings.
All you FreeHanders are still snickering because FreeHand can round just one corner, and opposite corners. Well, I have news for you. I can use the same technique I just employed to do just that: round any specific corner, some, or all. And of course, once it's a style, it's one click to apply it.
Pick a Corner… Any Corner
In Illustrator (more so than just about any other program) there are always a variety of ways to accomplish any design task. Some are more efficient than others. Some are easier to implement. Each offer pros and cons and each offer benefits for certain design tasks. With that in mind, I offer my solution for creating rectangles with a rounded corner (or three) of your choice.
Figure 3 is a rectangle that has rounded corners on two opposite sides.

Figure 3.
To make this shape, I created a normal rectangle and used the normal Round Corners effect (under the Effect > Stylize menu). I then added an additional fill, which didn't have rounded corners. With the second fill targeted, I applied a Transform effect that applied a 50% scale to the fill, and I instructed the Transform to be applied from a specific origin point — a corner of my choice. This action effectively covered up the rounded corner with a square corner. Had I expanded the shapes, the result would look like Figure 4.
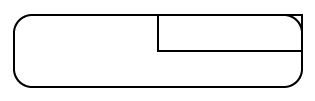
Figure 4.
The key here is in the Transform effect. Let's see how I did this, step-by-step:
- Draw a rectangle. Apply a fill and remove the stroke.
- Choose Effect > Stylize > Round Corners and apply the effect.
- Via the Appearance panel fly-out menu, add a new fill.
- With the new fill targeted, choose Effect > Distort & Transform > Transform. In the Scale section, set both the Horizontal and Vertical values to 50%. Now for the most important part — using the 9-point proxy, select one of the 4 corners to apply the scale from (Figure 5). The corner you choose will not have a rounded corner. Click OK to apply the effect.
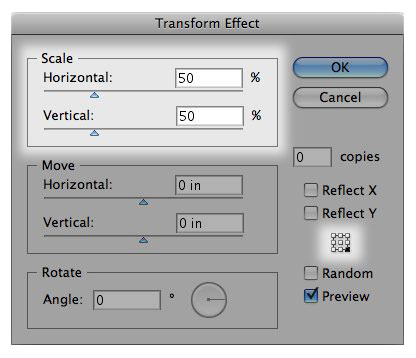 Figure 5.
 - Duplicate the fill and double-click the Transform effect in that fill. Change the origin point in that fill to specify another corner that should have a square corner. Repeat to add a third fill if you'd like. Your Appearance panel should look something like Figure 6.
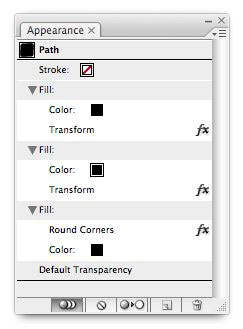 Figure 6.
You can save this as a Graphic Style so that you could apply this with a single click. You might even create an entire library of styles that stored different corners of an object as being rounded, for any design task. Of course, these are all graphic styles with multiple fills and effects. And sometimes you need just a single plain flat object with a rounded corner. You could of course draw your rectangle, quickly apply a style, expand the appearance, and then use Pathfinder to create a single final shape. But that's a lot of clicks. So having an action that would do all this for you with a simple keyboard shortcut is better.
In fact, being that the holidays are upon us, I've decided to give all of my dedicated readers a gift. Two, actually.
The first is a Graphic Style library (Figure 7) you can download. This library contains a plethora of styles with different round corner effects. All you need to do is load the style library and you're good to go. One click will give you the rounded corner(s) of your choice. Feel free to adjust the parameters as you see fit. I used a rather large round corner setting, mainly so the preview in the Graphic Styles panel clearly shows each effect.
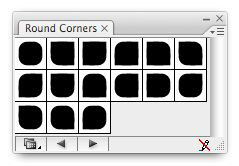
Figure 7.
The second downloadable gift is an Action that expands and combines the effect, leaving you with a flattened object. Once you load the Action, you can use the keyboard shortcut that I've assigned (Command-Shift-F12) or you can apply your own.
- Rounded Corner Graphic Style Library
- Expand and Combine Action
You can also copy and paste any of these shapes into InDesign if you'd like.
How To Repeat A Shape Around A Circle In Illustrator
Source: https://creativepro.com/round-corners-quickly-illustrator/
Posted by: hansoncitter.blogspot.com
0 Response to "How To Repeat A Shape Around A Circle In Illustrator"
Post a Comment